Collaboration and deployment stages
This page describes how to set up collaboration and deployment in Windmill as a progression of four stages, from simplest to most advanced. Each stage is additive: it builds on the previous one and adds one capability. Most teams settle at stage 2 or stage 3 — stage 4 is only needed when you need a separate production environment with a promotion workflow.
| Stage | What you add | Git required | Forks | Workspaces |
|---|---|---|---|---|
| Stage 1 | Shared workspace, u/ → f/ | No | No | 1 |
| Stage 2 | Forks, merge UI, protection rulesets | No | Yes | 1 |
| Stage 3 | Bi-directional git sync, local development | Yes | Yes | 1 |
| Stage 4 | Multi-workspace (dev/staging/prod) | Yes | Yes | 2+ |
- Stage 1 works on any edition.
- Stage 2 relies on workspace forks and protection rulesets, which are Cloud or Enterprise Self-Hosted only.
- Stage 3 adds git sync, available on Cloud and Enterprise Self-Hosted, and on Community Edition for workspaces with up to 2 users.
- Stage 4 requires git sync and is Cloud or Enterprise Self-Hosted only.
Stage 1 — Shared workspace
Everyone on the team works in the same workspace. Developers iterate in their own user space (u/<user>/) and, once an item is ready to be shared, move it to a shared folder (f/<folder>/). This is the simplest possible setup and the right starting point for almost every team.
Architecture
- One workspace (for example
main) - Developers own
u/<username>/and iterate there - Shared items live under
f/<folder>/, with folder-level permissions granting write access to the relevant group - No git, no forks, no protection rulesets
Setup
- Create a workspace and invite your team.
- Create one or more folders that represent your projects, and assign write permission to the groups that should own each project.
- That's it — developers can start building.
Developer workflow
- A developer creates a script, flow or app under
u/<their-name>/. Items in user space are private to them by default. - They iterate freely, test, and share drafts with teammates via the draft system.
- When the item is ready, they move it from
u/<user>/to the appropriatef/<folder>/. Moving an item into a folder transfers ownership to that folder's permissions. - Other members of the folder's group can now edit, run, and depend on the item.
When to move to stage 2
- Someone broke an item in the shared workspace and you wish it had been isolated.
- You want a review gate before changes reach the shared workspace.
- Developers want sandboxes to test risky changes without affecting anyone else.
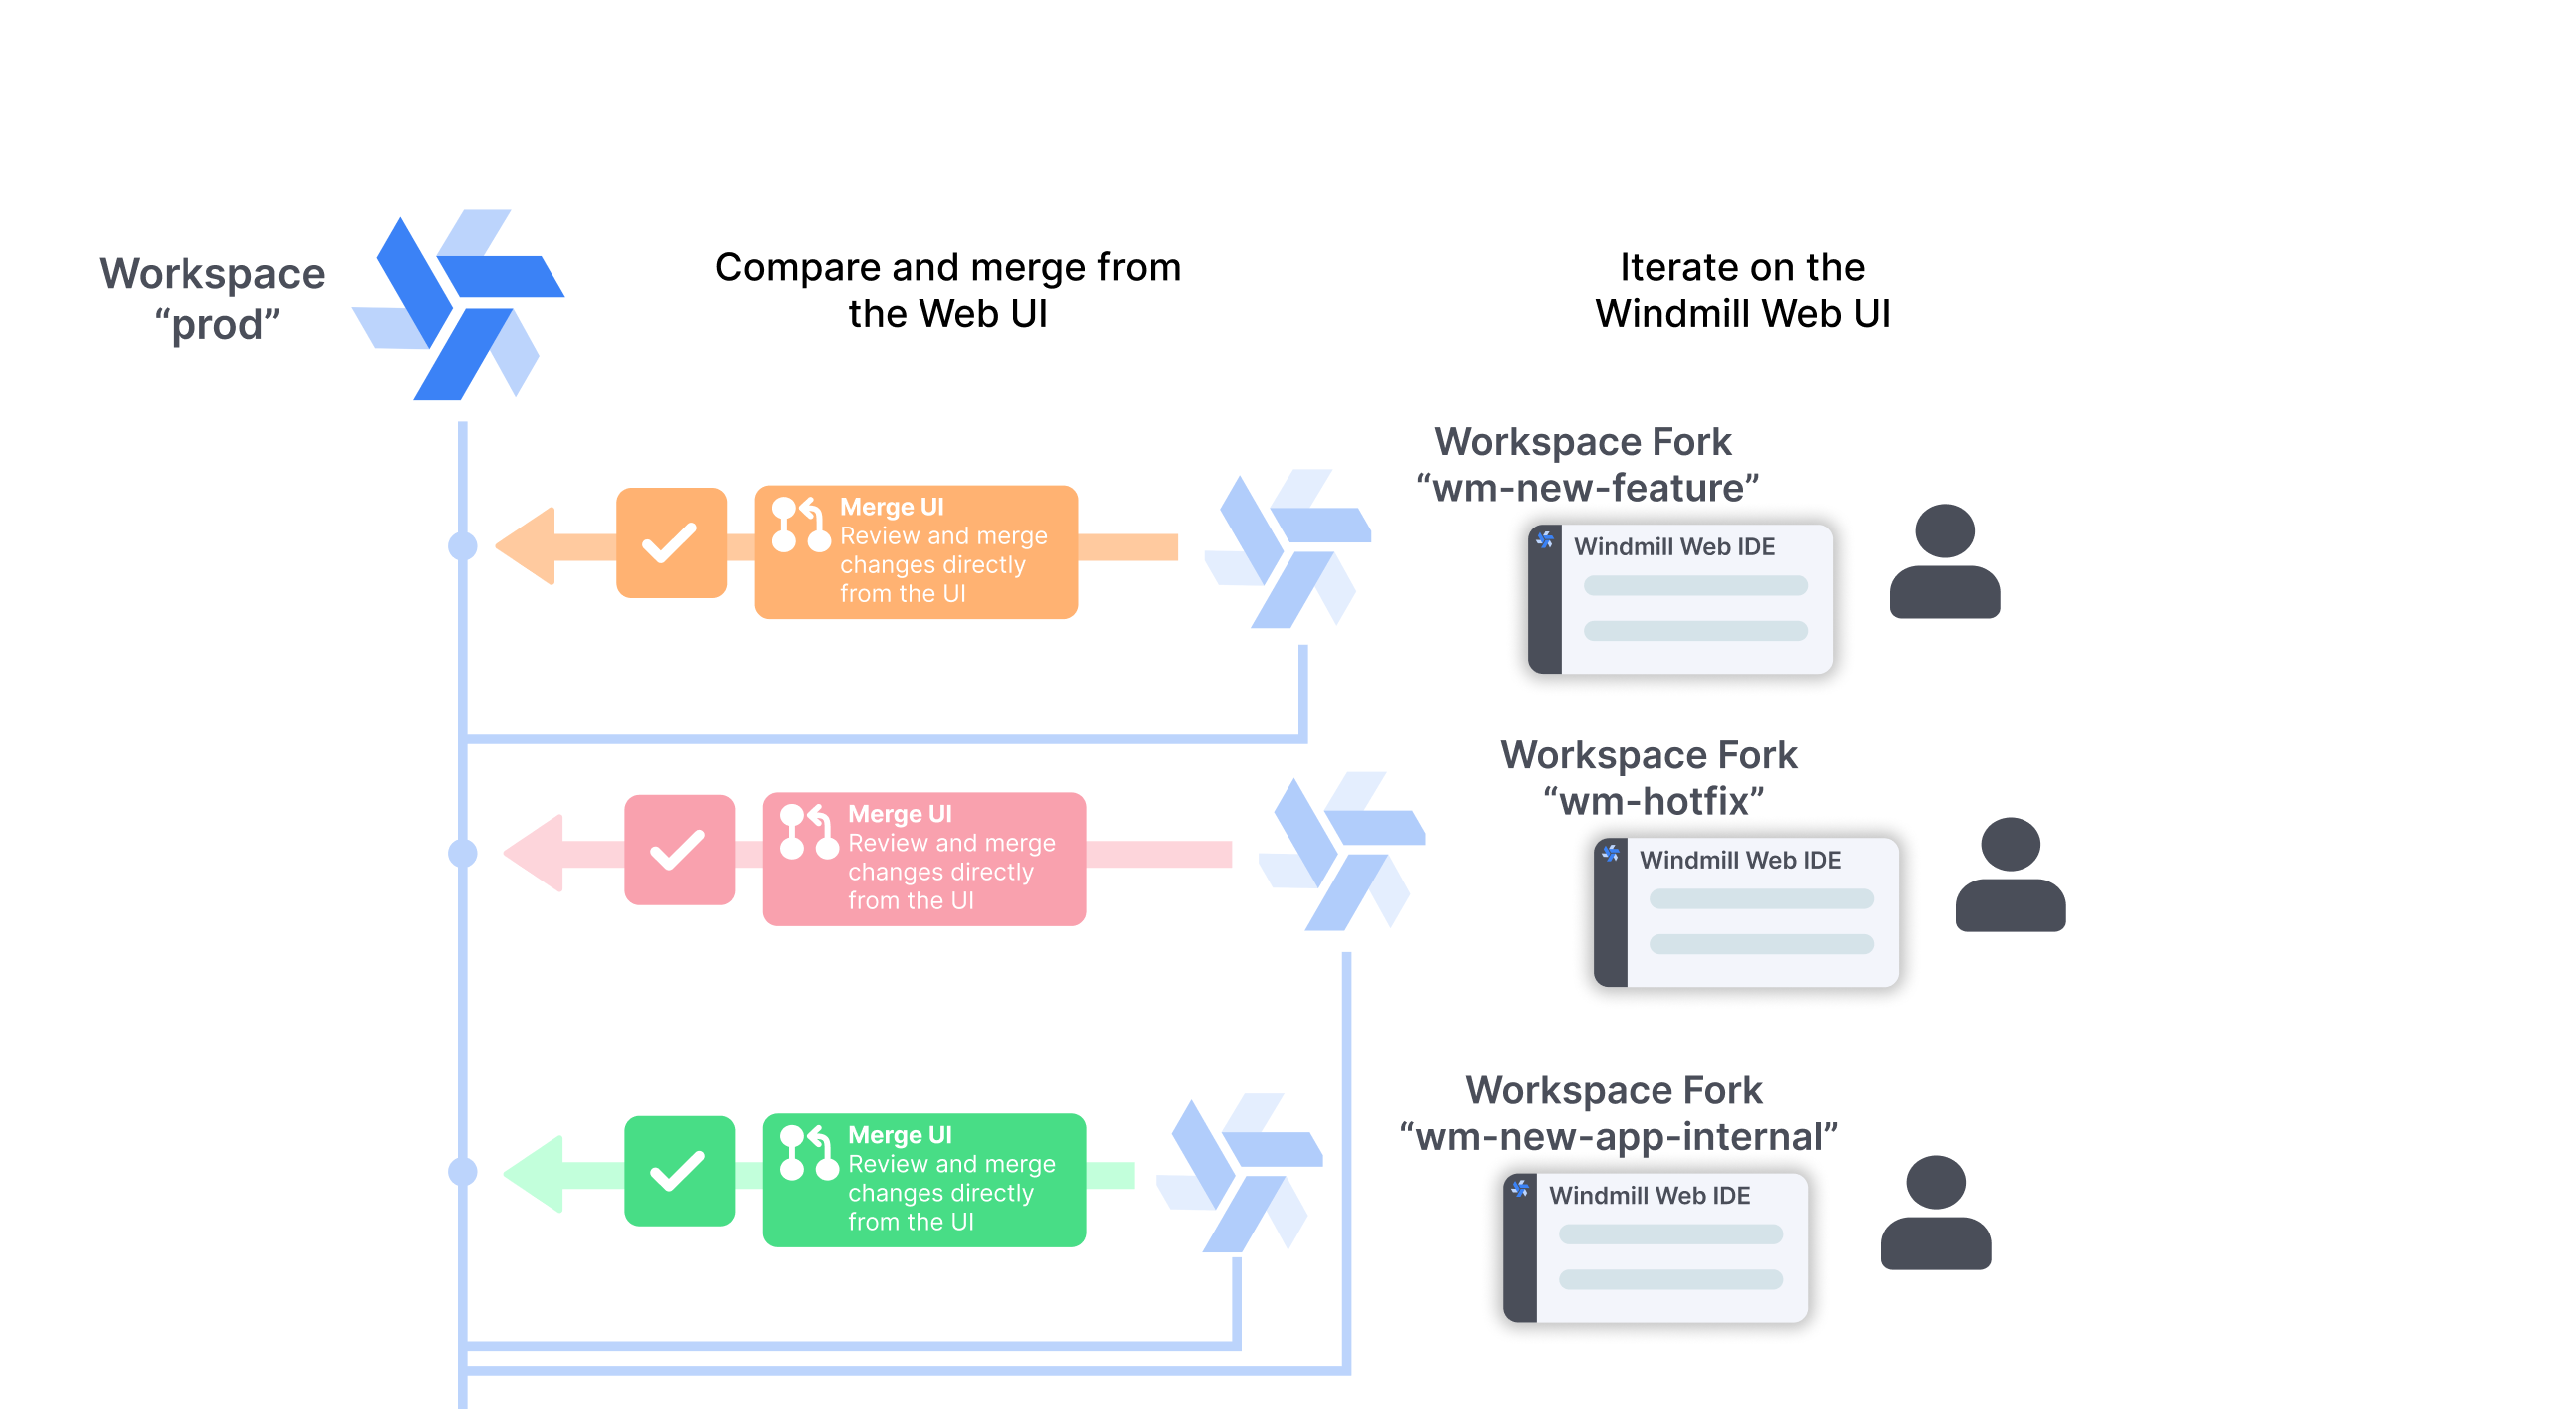
Stage 2 — Add forks and the merge UI
Stop editing the shared workspace directly. Instead, developers create a workspace fork for each change, iterate in the fork, and merge back via the merge UI. Protection rulesets enforce this: direct deploys to the shared workspace are blocked except for a small wm_deployer group.
This is still a pure UI workflow — no git, no CI/CD, no external tools. Stage 3 will add git sync on top, and forks integrate seamlessly with it when you get there.
Forks are not a prerequisite for stage 3. Git sync works on a plain shared workspace, so if you already want git history and local development, you can skip this stage and go straight to stage 3. Adopt forks later if you need isolated sandboxes and a review gate.
Architecture
- One shared workspace (same as stage 1), now called
prodormain - Protection rulesets block direct deploys; a
wm_deployergroup has bypass permissions - Developers create workspace forks to develop features
- Changes merge back through the merge UI
Setup
1. Create the wm_deployer group
- Open the workspace settings and go to Groups.
- Create a group called
wm_deployerand add the users who are allowed to deploy directly or approve merges.
2. Enable protection rulesets
- Go to Workspace settings → Protection Rulesets.
- Add a rule that enables Disable direct deployment.
- Add the
wm_deployergroup to the bypass list.
This blocks everyone except the deployer group from modifying f/ items directly. Developers must now use forks.
Developer workflow
- A developer creates a workspace fork from the shared workspace via the workspace menu.
- They iterate, test, and deploy freely inside the fork — triggers are not copied over to avoid unwanted executions.
- When ready, they open the fork home page, click Review & Deploy Changes, and review the diff in the merge UI.
- A member of
wm_deployerapproves the merge. The changes land in the shared workspace.
When to move to stage 3
- You want a history of changes outside Windmill (audit, backup, rollback).
- You want to edit scripts and flows locally in your IDE or with agentic coding tools like Claude Code.
- You want fork branches mirrored in git so PRs can be reviewed there too.
- You're planning to add a separate production environment (stage 4), which requires git sync.
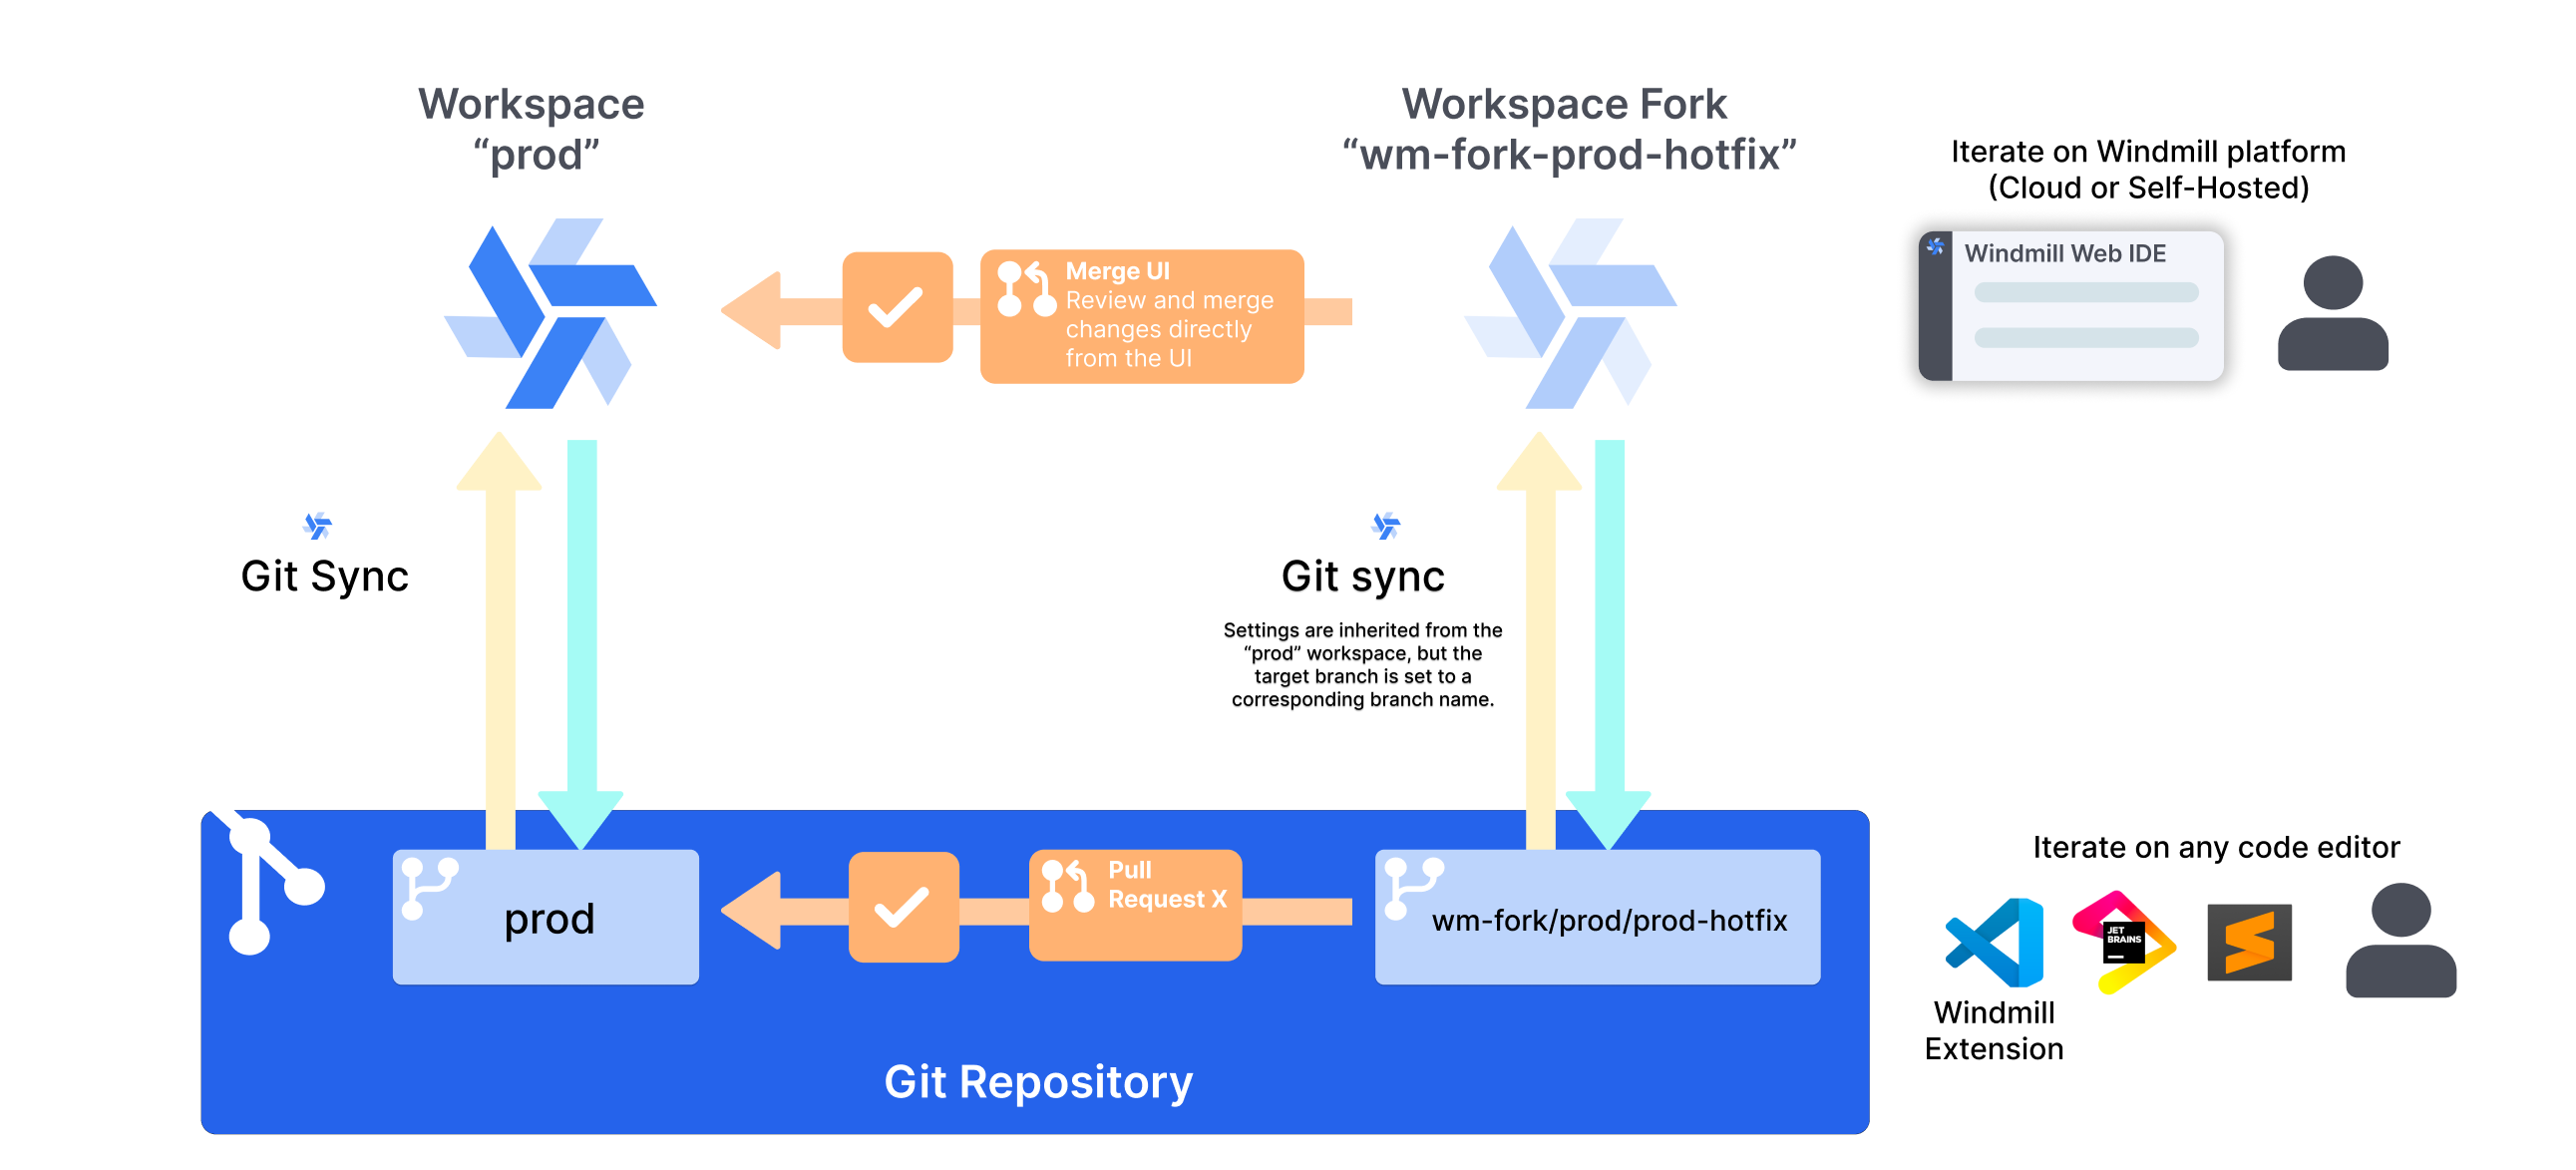
Stage 3 — Add git sync
Connect the workspace from stages 1 and 2 to a git repository using git sync. Every deploy is committed to git, and changes pushed to the repository are synced back to Windmill via CI/CD. This gives you a full audit trail, external version control, and local development — and each fork from stage 2 now automatically gets its own git branch, so the merge UI and git PRs stay in lockstep.
Git sync is available on Cloud and Enterprise Self-Hosted, and on Community Edition for workspaces with up to 2 users.
Architecture
- The shared workspace and its forks from stage 2, unchanged
- A git repository with a single branch (for example
main) - Git sync configured on the workspace: each deploy pushes a commit
- A CI/CD workflow that syncs commits back to the workspace, enabling bi-directional sync
- A
wmill.yamlfile in the repository with a single entry in theworkspaces:key - Fork branches auto-created as
wm-fork/<parent-branch>/<fork-name>
Setup
1. Create the git repository
Create an empty repository on GitHub, GitLab or similar with a single main branch.
2. Configure git sync on the workspace
- Go to Workspace settings → Git Sync.
- Click + Add connection and create a
git_repositoryresource pointing at your repository and themainbranch. - Save. Use Initialize Git repository to populate the repository with the current workspace contents and a default
wmill.yaml.
See the full walkthrough in git sync setup.
3. Add the CI/CD workflows
Git sync only pushes from Windmill to git by default. To make changes in git flow back into the workspace, add GitHub Actions workflows (or equivalent). A working reference is the windmill-sync-example repository. You will want:
push-on-merge.yaml— runswmill sync pushwhen commits land onmain.push-on-merge-to-forks.yamlandopen-pr-on-fork-commit.yaml— keep fork branches in sync and open PRs automatically.
Without the fork workflows, forks still work exactly as in stage 2 — their git branches just won't receive external edits.
You will need:
- A Windmill user token saved as a
WMILL_TOKENGitHub secret. - The
WMILL_WORKSPACEandWMILL_URLvariables set in the workflows.
Full details in git sync CI/CD setup.
4. Minimal wmill.yaml
A single-workspace wmill.yaml looks like this:
defaultTs: bun
includes:
  - f/**
excludes: []
skipVariables: true
skipResources: true
skipSecrets: true

workspaces:
  main:
    baseUrl: https://app.windmill.dev
    gitBranch: main
See workspace-specific items for the full schema.
Developer workflow
- Developers continue to use forks from stage 2. When they create a fork, a matching
wm-fork/main/<name>git branch is created automatically. - They can now also edit the fork locally: work on the workspace outside of Windmill with
wmill sync pull, edit in their IDE, the VS Code extension, or an agentic coding tool like Claude Code, thenwmill sync pushback. - Every deploy creates a commit in the git repository.
- Merging a fork via the merge UI or via a normal git PR both work — pick whichever your team prefers for review.
- External commits (from local development or PR merges) are replayed into the workspace by the CI/CD workflow.
When to move to stage 4
- You need a separate production environment that is fully isolated from day-to-day development.
- You want PR-based review on the promotion step, not just the merge-to-shared step.
- You're deploying across multiple Windmill instances.
Stage 4 — Add multi-workspace promotion
Introduce one or more additional workspaces (for example staging and prod), each connected to its own git branch. Day-to-day development happens on staging using forks (exactly as in stage 3). When changes are ready for production, they are promoted from staging to prod through git promotion, which opens a PR on the prod branch.
The prod workspace is never edited directly. Its only source of change is a merged PR on the prod branch.
Architecture
- Two (or more) workspaces, each on its own git branch
- Each workspace has its own
git_repositoryresource and its own entry underworkspaces:inwmill.yaml - Git sync is configured in promotion mode from
stagingtoprod - Developers edit
stagingvia forks (stage 2 pattern) prodis protected by protection rulesets and only the promotion CI/CD can deploy to it
| Workspace | Git branch | Promotes to |
|---|---|---|
| staging | staging | prod |
| prod | prod | — |

Setup
1. Create the branches and workspaces
- In your git repository, create a
stagingbranch and aprodbranch. - Create a
stagingworkspace and aprodworkspace in Windmill.
2. Configure git sync on each workspace
For each workspace, go to Workspace settings → Git Sync and create a git_repository resource pointing at the corresponding branch:
stagingworkspace →git_repositoryonstagingbranchprodworkspace →git_repositoryonprodbranch
3. Configure the promotion target
On the staging workspace:
- Under the git sync connection, click Add promotion target.
- Create a separate
git_repositoryresource targeting theprodbranch (this is not the same resource as the one used for git sync). - Save.
The git sync resource points at the workspace's own branch (staging). The promotion target points at the target branch (prod). They must be different git_repository resources, even if they point at the same repository.
4. Add the CI/CD workflows
push-on-merge.yaml— one copy per workspace (WMILL_WORKSPACE=staging,WMILL_WORKSPACE=prod), triggered by merges tostagingandprodrespectively.open-pr-on-promotion-commit.yaml— opens a PR onprodwhen staging promotes a change.push-on-merge-to-forks.yamlandopen-pr-on-fork-commit.yaml— unchanged from stage 3, now scoped to thestagingworkspace.
See git sync CI/CD setup for the workflow files.
5. Multi-workspace wmill.yaml
defaultTs: bun
includes:
  - f/**
excludes: []

workspaces:
  staging:
    baseUrl: https://app.windmill.dev
    gitBranch: staging
    specificItems:
      resources:
        - "f/config/**"
      settings: true

  prod:
    baseUrl: https://app.windmill.dev
    gitBranch: prod
    specificItems:
      resources:
        - "f/config/**"
      settings: true
Each workspace declares its own gitBranch. Items listed under specificItems (for example, environment-specific database credentials) are stored per workspace on disk. See workspace-specific items for the full schema.
By default, a newly deployed script, flow, app, schedule or trigger runs as whichever user pushed it. For CLI / CI/CD deploys that's the identity behind WMILL_TOKEN — typically a workspace admin or a dedicated deploy user that you've added to wm_deployers. If you want items under a folder to run as a specific service account instead — and to differ per environment — set default_permissioned_as rules on the folder in the target workspace:
# f/customer_x/folder.meta.yaml — committed per workspace via specificItems
summary: ''
display_name: customer_x
owners: []
extra_perms: {}
default_permissioned_as:
  - path_glob: 'jobs/**'
    permissioned_as: u/customer_x_svc    # or g/customer_x or an email
  - path_glob: '**'
    permissioned_as: u/ops
Rules are ordered; the first path_glob (relative to the folder root) that matches an item wins. Applied only at create time and only when the caller is admin or a member of wm_deployers — existing items are untouched, and non-deployer users still deploy as themselves. Set folders: ["f/**/folder.meta.yaml"] under specificItems in wmill.yaml if you want different rules per workspace on the same path.
Edit the rules in the folder settings UI, or commit them directly in folder.meta.yaml. The CLI also exposes per-item overrides for already-deployed items via wmill script|flow|app|schedule|trigger set-permissioned-as <path> <email>.
Folder defaults are advisory: they only fill in the default when the pushed item does not already carry an explicit on_behalf_of. To opt in to CLI preview of which items will be affected by rules on the next push, set syncBehavior: v1 in wmill.yaml.
6. Protect prod
Enable protection rulesets on the prod workspace with no bypass group — the only way in is the promotion PR.
Developer workflow
- A developer needs to change something. They fork the staging workspace (not prod).
- They iterate in the fork and merge back to
stagingvia the merge UI. This is the stage 2 workflow plus the git sync integration from stage 3. - When the change needs to go live, they trigger a git promotion from
stagingtoprod. - A PR is opened on the
prodbranch. The team reviews it in their git platform. - Merging the PR triggers the
push-on-merge.yamlworkflow, which syncsprodto the new state.
Advantages
- Fully isolated production environment with a git PR as the only gate.
- Dev/staging/prod across multiple Windmill instances if needed.
- Per-workspace configuration via workspace-specific items.
- All the benefits of stages 1–3 still apply.
Choosing a stage
Most teams should start at stage 1 and only move up when they feel the pain the next stage solves. Stage 4 is real operational overhead and should not be the default — the majority of teams are well served by stages 2 or 3.
- Stage 1 if you have a small team, no compliance requirements, and a single environment is fine.
- Stage 2 if you want enforced review on every change and isolated sandboxes, but don't need external version control.
- Stage 3 if you want git history, backup, local development, and the option of git PR-based review on top of stage 2.
- Stage 4 if you need a separate production environment with a promotion gate, or you deploy across multiple Windmill instances.
Stages 1 → 2 → 3 → 4 are designed to be adopted in order, but you can skip stages: a small team on Community Edition can go stage 1 → stage 3 (skip forks) to get git sync and local development without needing fork-based review.